
A lot of places where you have seen that there are many images where some text has been added dynamically. For example watermark on and image or any wishing script where user write their name and the name automatically added to an image. Today I will teach you how to add text to an image by using PHP. You can also download the source file from the end of the article.
So our goal is user enter any name to a textbox and then click on submit, it will be automatically added to and image on a specific position. I assume you have already installed local server like xampp or wamp. So first write basic HTML code like below and save it as index.php.
<!doctype html>
<html lang="en">
	<head>
		<!-- Required meta tags -->
		<meta charset="utf-8">
		<meta name="viewport" content="width=device-width, initial-scale=1, shrink-to-fit=no">

		<title>Add text to image by using PHP</title>
	</head>
	<body>
		<form action="index.php" method="post">
			<input type="text" name="user_name">
			<button type="submit">Set Name</button>
		</form>

	</body>
</html>
Above code has one form with a textbox and a submit button. We have set the action to the same file i.e. index.php and method should be POST. Now we are going to write the PHP code to handle the POST request.
<?php

	//check if method is post
	if($_POST){

		//get username
		$user_name = $_POST['user_name'];


		//show the user text on image
		echo '<img src="img.php?user='.$user_name.'">';

	}else{
		echo '<img src="img.php">';
	}
?>
The above code we are going to check if the method is POST or not. If a user enters any text and clicks on submit then $_POST variable store the text to user_name. Basically, $_POST is an array which stores user-submitted data to user_name element. If the method is not POST then it will show the code present in else section. Below is the full code of index.php file-
<!doctype html>
<html lang="en">
	<head>
		<!-- Required meta tags -->
		<meta charset="utf-8">
		<meta name="viewport" content="width=device-width, initial-scale=1, shrink-to-fit=no">

		<title>Add text to image by using PHP</title>
	</head>
	<body>

		<?php

			//check if method is post
			if($_POST){

				//get username
				$user_name = $_POST['user_name'];

				//show the user text on image
				echo '<img src="img.php?user='.$user_name.'">';

			}else{
				echo '<img src="img.php">';
			}
		?>

		<form action="index.php" method="post">
			<input type="text" name="user_name">
			<button type="submit">Set Name</button>
		</form>

	</body>
</html>
The else section contains an image. But notice, instead of regular image file i.e. .jpg, .gif, .png, we are using a PHP file. Here the img.php file works as an image by changing its header through PHP. So create another file called img.php at the same location where index.php present.
First we need to tell the browser that, this is a image file. So we are going to add header at the top of the script.
header("Content-type: image/jpeg");As we set the content-type of the file is image/jpeg by above code, when a browser opens the img.php file, it will think the file is a jpeg image. If we set image/png, the browser will think the file is png file.
After that, create a folder called images where index.php and img.php are present. Inside the folder copy and jpeg image. I have copied an image and name it base-img.jpg. Create a variable and store the image location like this-
$img_path = "images/base-img.jpg";Here we are using custom true type font. So create another folder called font and copy any font into this folder. I have copied a font and rename it to font. You can use the original name of that font or you can rename it to any name. After that create a variable called $font_path and store the font location like below-
$font_path = realpath("font/font.ttf");Here you can see I am using realpath(). Here realpath will return the absolute location of the font file where as relative path shows website URL instead of an internal path. After that, we will create an image object by imagecreatefromjpeg() function. Keep in mind, as we are using jpeg format that’s why we use imagecreatefromjpeg() function. If we want to add text to a png image format, then use the function imagecreatefrompng().
imagecreatefromjpeg() function takes image file location, that’s why we passed $img_path as the location of the image.
$jpg_img = imagecreatefromjpeg($img_path);Now suppose a user enters their name and click on submit, in index.php file the $_POST variable store the name. We can get the name by below code –
$user_name = $_POST['user_name'];We are going to pass the $user_name to img.php as a query string like below-
//show the user text on image
echo '<img src="img.php?user='.$user_name.'">';
In img.php by using isset() function, we will check if the query string variable user is set or not. If yes, then store the data into $text variable. See the code below –
if(isset($_GET['user'])){
	$text = $_GET['user'];
}
How to set the colour to dynamically added text on an image in PHP?
Now we need to set the text colour. By using imagecolorallocate() function we can set the desired colour to the text. It will take the image and colour as a parameter. So the first parameter should be the image created from imagecreatefromjpeg() function. See the below code-
$font_color = imagecolorallocate($jpg_img, 255, 255, 255);
Here $jpg_img stored the image through imagecreatefromjpeg() function, and pass the RGB value. Here RGB value is 255, 255, 255. So the colour will be white.
How to add text to that image?
We can set a text to an image by using imagettftext() function. The syntax of the function is-
imagettftext ( resource $image , float $size , float $angle , int $x , int $y , int $color , string $fontfile , string $text ) : arraySo our code should be like this –
imagettftext($jpg_img, 30, 0, 10, 60, $font_color, $font_path, $text);The first parameter is $jpg_img which stored the image created from imagecreatefromjpeg() function. The 2nd one is 30 which is font size. If you want to rotate the text then you can pass number to the parameter. As we don’t want to rotate, that’s why passed 0. The 4th and 5th parameter is for the location of the text where you want to show the text and the rest of the parameter is pretty straightforward.
If you want to add another text to another position with different font colour or size, then create another line with imagettftext(). If you want a different font or colour, change the font path to another font or change the RGB value in imagecolorallocate($jpg_img, 150, 200, 230);
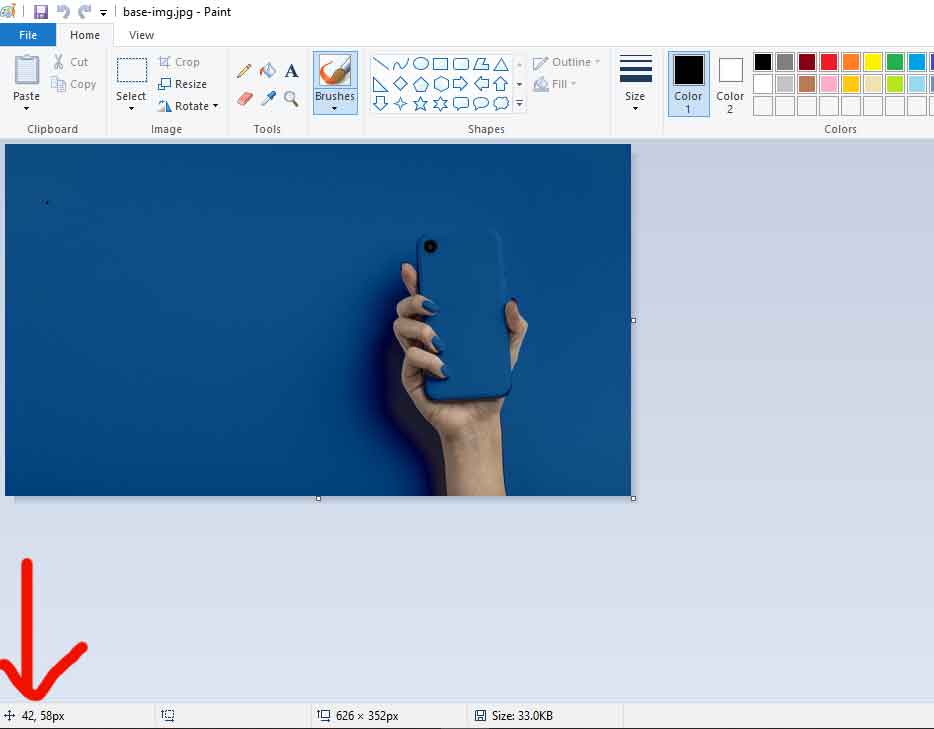
How to find the x, y coordinate of the image using Paint tool?
Open the image in Paint. Move the mouse pointer on the image where you want to show add a text. Look into the bottom left corner of the paint window. You can get the position value. Use the position value to imagettftext().
here is the full code of img.php file-
<?php

	header("Content-type: image/jpeg");

	$img_path = "images/base-img.jpg";
	$font_path = realpath("font/font.ttf");

	$jpg_img = imagecreatefromjpeg($img_path);


	if(isset($_GET['user'])){
		$text = $_GET['user'];
		$font_color = imagecolorallocate($jpg_img, 255, 255, 255);

		imagettftext($jpg_img, 30, 0, 10, 60, $font_color, $font_path, $text);
	}

	imagejpeg($jpg_img);
	imagedestroy($jpg_img);

?>
The imagejpeg($jpg_img) again create the image with the text on it. At last, destroy the image by imagedestroy($jpg_img) function.
As a conclusion, if you will face any problem like the image is not showing or text not display on the image, try to comment the line (“//”) at img.php like below
//header("Content-type: image/jpeg");So you can easily debug the code if you have any mistake to give proper font path or image path. Thank you, guys. Hope this tutorial helped you. Click here to download the file.